How to Cook a Pork Butt in the Oven

How to Cook a Pork Butt in the Oven: Full Guide to Tender, Flavor-Packed Results

Pork butt is a cut that rewards patience. It’s rich in connective tissue and intramuscular fat, which means the longer you cook it, the better it gets. When I want meat that pulls apart effortlessly, absorbs every bit of flavor from seasoning, and fills the kitchen with deep, smoky aroma—even without a smoker—I go with pork butt.
- Why Pork Butt Is One of My Favorite Cuts
- Understanding Pork Butt: What You’re Working With
- Selecting and Trimming the Right Pork Butt
- Essential Ingredients and Tools for Oven Roasting
- Dry Rubs and Marinades: Building Flavor Before the Oven
- The Importance of Resting at Room Temperature
- How to Slow-Roast Pork Butt in the Oven
- Oven Temperature and Time Table Based on Weight
- Using the Oven Broiler for a Final Crust
- Cooking Pork Butt in the Pressure Cooker
- Microwaving Pork Butt: When It Works and When to Avoid It
- Pan-Searing Small Cuts of Pork Butt
- Common Mistakes When Cooking Pork Butt
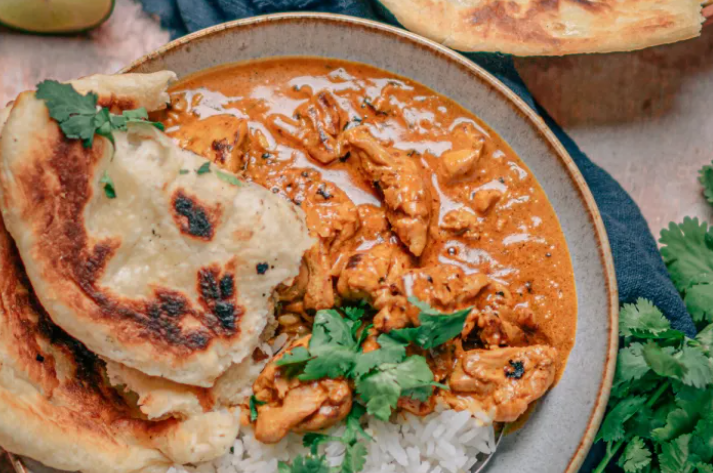
- Best Sauces and Finishes for Pork Butt
- Serving and Pairing Ideas
- Storage and Reheating Without Losing Moisture
- FAQ
Why Pork Butt Is One of My Favorite Cuts
I’ve used this cut for everything from classic pulled pork sandwiches to hearty stews and elegant plating. Oven roasting gives you full control over time and temperature, making it perfect for beginners who want a restaurant-quality outcome without needing a grill or smoker.
What makes it forgiving and flavorful
This cut is incredibly forgiving. You can overcook it by an hour and still end up with juicy, tender results. That’s thanks to the fat marbling and collagen, which break down during low and slow roasting to create moist, succulent meat. It’s also versatile—you can serve it sliced, shredded, or cubed depending on your goal.
Oven roasting vs smoking or slow cooker
While smoking adds depth, I often prefer the oven because it offers more control in home kitchens. You can apply dry heat for bark development or trap steam for extra moisture. Unlike a slow cooker, the oven gives you the option to finish with a high-heat blast for that coveted crust on the outside.
Understanding Pork Butt: What You’re Working With
Before cooking, it’s important to know exactly what pork butt is. The name is misleading—it doesn’t come from the rear of the pig. Pork butt, also known as Boston butt, is actually part of the shoulder.
Bone-in vs boneless
Both versions work, but they behave a little differently in the oven. I prefer bone-in for flavor and moisture—it acts as an internal heat buffer and helps the meat cook evenly. Boneless is easier to carve or shred and usually cooks faster. When using boneless, I tie it with butcher’s twine for a uniform shape and even roasting.
Boston butt vs picnic shoulder
Boston butt (upper part of the shoulder) has more marbling and a smoother grain, which I find better for oven roasting. Picnic shoulder (lower part) contains more sinew and skin. It’s excellent for stews or braises but can be tougher if roasted dry. For most oven applications, I reach for a 5–8 pound Boston butt.
Selecting and Trimming the Right Pork Butt
Choosing the right cut starts at the butcher counter. A well-marbled pork butt is key to achieving juicy, flavorful results. Don’t be afraid to inspect the fat and shape closely.
Ideal weight and marbling
I look for pork butts between 5 and 8 pounds, which roast evenly in a standard oven. You want visible fat striations running through the meat—not just around it. That internal marbling melts during roasting and bastes the meat from the inside.
The surface should be pink, not pale or gray. Avoid vacuum packs with excess liquid—that usually means the meat is older or improperly stored. I also try to get a roast with a relatively uniform shape for even cooking.
What fat to leave on
I keep a ¼-inch layer of fat on the top, which protects the meat and adds flavor as it renders. I trim off any hard surface fat that won’t melt and any stray flaps that might burn or dry out. If I’m planning to broil at the end, I’ll score the fat lightly to help it crisp.
Essential Ingredients and Tools for Oven Roasting
- Pork butt (5–8 lbs, bone-in or boneless)
- Kosher salt
- Coarse black pepper
- Smoked paprika
- Garlic powder
- Onion powder
- Olive oil or yellow mustard (binder)
- Optional: brown sugar or chili powder (for rub variation)
- Large roasting pan
- Heavy-duty foil
- Rack (optional but helpful for airflow)
- Meat thermometer (instant-read or probe)
- Basting brush
- Paper towels
Dry Rubs and Marinades: Building Flavor Before the Oven
Seasoning pork butt is more than just salt and pepper—it’s about creating layers of flavor that will penetrate the meat over hours of slow cooking. I prefer a dry rub for most oven-roasting applications, but I also use wet marinades when I want a bolder flavor profile or a tangier result.
My go-to spice blend
My standard rub includes kosher salt, coarse black pepper, smoked paprika, garlic powder, and onion powder. If I want a deeper color or slightly sweet bark, I add a spoonful of brown sugar and a dash of chili powder. I apply the rub generously on all sides after coating the meat lightly in olive oil or yellow mustard, which helps it stick and encourages crust formation.
I apply the rub at least one hour before cooking—or the night before if I have time. Overnight seasoning gives the salt a chance to penetrate the surface and start the tenderizing process.
When I use overnight marinades
If I want brighter, more acidic flavor—like in Cuban-style pork—I’ll use a marinade with citrus juice, garlic, oregano, and olive oil. I keep the pork in a sealed bag or covered dish in the fridge for 12–24 hours. Before roasting, I always pat the meat dry and reapply a dry rub for better browning.
The Importance of Resting at Room Temperature
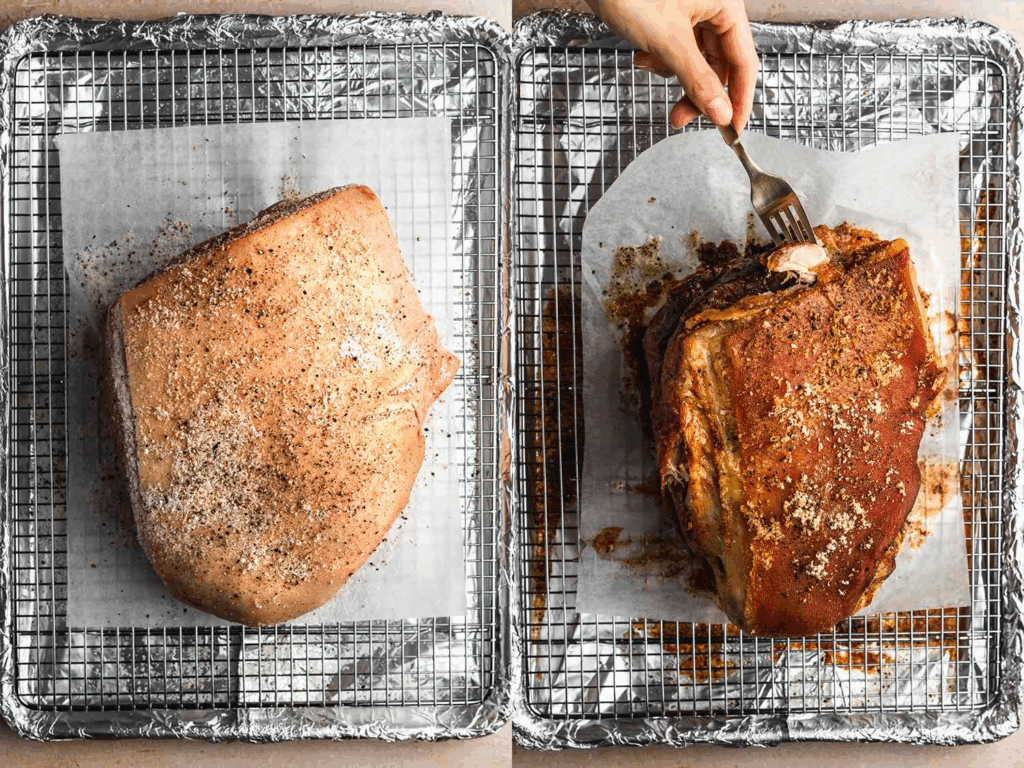
Letting pork butt rest before it goes into the oven is a step most home cooks skip, but I never do. Starting from fridge-cold leads to uneven cooking and a gray, wet crust. Resting and surface drying ensure a better bark and more even heat distribution.
Surface drying for crust
I remove the pork from the fridge at least one hour before roasting and place it on a wire rack over a sheet tray. This allows air to circulate and dries the surface, which is crucial for getting a flavorful crust. I sometimes pat it again with paper towels right before placing it in the oven.
Temperature evenness inside the meat
Room-temperature meat cooks more evenly, especially in the dense interior of a pork butt. This minimizes the temperature gradient between the exterior and center, which is important when cooking low and slow for hours. It’s one of the simplest tricks I use to improve results.
How to Slow-Roast Pork Butt in the Oven
This is the heart of the technique. I roast pork butt low and slow—usually around 275°F (135°C)—because it gives the collagen and fat time to break down into gelatin, which makes the meat tender and moist. High heat will only dry it out or cook the outside too fast.
Low temperature, long cook
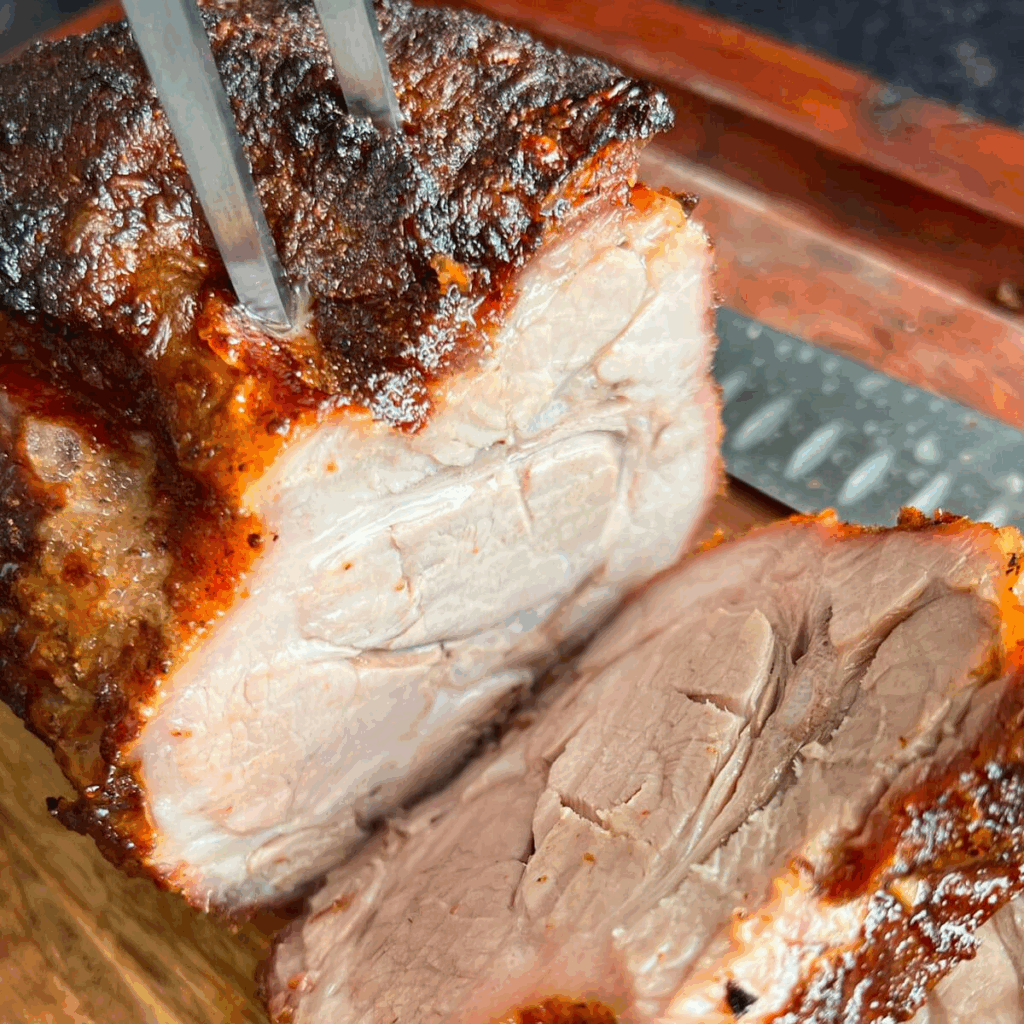
I place the pork fat-side up on a rack inside a roasting pan. This lets rendered fat drip through and prevents the bottom from steaming. I insert a probe thermometer into the thickest part—not touching the bone—and roast uncovered until it reaches an internal temp of 160–165°F. This is the stage where the crust forms and the internal tissues begin to soften.
At this point, I tent the roast loosely with foil or cover the pan completely and continue roasting until it reaches 195–203°F, depending on whether I plan to shred or slice. The second phase is when the pork “breaks down” and becomes fall-apart tender.
Covered vs uncovered technique
I always start uncovered for bark development, then cover once color is deep and crusty. This keeps the interior juicy and protects it from burning or over-drying. For extra bark, I’ll uncover the meat during the final 20–30 minutes or finish under the broiler.
Oven Temperature and Time Table Based on Weight
Here’s the time and temperature breakdown I use when roasting pork butt in the oven. It’s based on my experience in both restaurant and home settings:
| Weight (lbs) | Temp (°F / °C) | Time (uncovered + covered) | Internal Temp Goal | Result |
| 5 | 275°F / 135°C | 3 hrs + 2 hrs | 195°F / 90°C | Shreddable |
| 6–7 | 275°F / 135°C | 4 hrs + 2.5 hrs | 200°F / 93°C | Very tender |
| 8 | 300°F / 150°C | 3.5 hrs + 3 hrs | 203°F / 95°C | Fall-apart |
| 5–7 | 325°F / 163°C | 4–5 hrs total | 185°F / 85°C | Sliced pork |
For pulled pork, I always aim for 195–203°F. For slicing, I pull it at 180–185°F, rest it 30 minutes, and slice against the grain.

Using the Oven Broiler for a Final Crust
When I want to finish a pork butt with deep color and slight crispiness, I use the oven broiler during the last 5–10 minutes. This is especially helpful if the roast was covered for much of the cooking time and didn’t develop a proper bark.
When and how to broil after slow-roasting
I uncover the pork once it reaches full internal temperature—around 195°F for shredding or 185°F for slicing—and switch the oven to broil on high. I move the roast to the upper third of the oven and broil for 3 to 5 minutes, watching closely the entire time.
If I’ve added a glaze—such as a mix of brown sugar, cider vinegar, and mustard—it bubbles and caramelizes beautifully under the broiler. Otherwise, I brush the surface with a thin layer of fat from the pan juices before broiling to rehydrate and intensify flavor.
Glaze or dry rub reapplication
For maximum flavor, I sometimes mix a little extra rub with a spoon of pan drippings or mustard and brush it on just before broiling. This gives the pork a final layer of spice and sweetness without overpowering the original seasoning.
Cooking Pork Butt in the Pressure Cooker
When I’m short on time but still want flavorful, tender pork, the pressure cooker is my best friend. It takes a cut that normally requires five hours in the oven and transforms it in about one hour without sacrificing moisture.
When time is short
I cut the pork butt into 3–4 large chunks, season with the same rub I’d use for oven roasting, and sear each piece in the pressure cooker using the sauté function until browned. Then I add aromatics—onion, garlic, broth, and sometimes apple cider vinegar—for flavor and moisture.
I cook on high pressure for 60–75 minutes, depending on the size of the chunks. After a 15-minute natural pressure release, the meat is usually tender enough to shred with tongs.
Flavor-infused broth approach
The cooking liquid turns into a rich broth. I reduce it into a sauce or mix it into the shredded pork to add moisture. If I’m serving it later, I strain and reserve the liquid to pour over reheated portions for extra juiciness.
Microwaving Pork Butt: When It Works and When to Avoid It
I don’t recommend microwaving raw pork butt, but for reheating shredded leftovers, it’s quick and effective—as long as you avoid drying the meat.
Shredded leftovers only
Microwaving only works well with already-cooked, shredded pork. I place it in a covered container with a bit of broth or reserved cooking liquid, then heat at 50–60% power in 30-second intervals, stirring between rounds to distribute heat evenly.
I avoid full power—it overheats the edges while leaving the center cold. I stop reheating once it’s just warmed through, then add fresh sauce or lemon juice to refresh the taste.
Cover, power level, and moisture retention
Always cover the container with a microwave-safe lid or plate to trap steam. If the pork is looking dry, I drizzle olive oil, vinegar, or butter before heating. Properly reheated, it stays juicy and flavorful—even the next day.
Pan-Searing Small Cuts of Pork Butt
If I’m not working with a whole roast, I often pan-sear pork butt slices or chunks. It’s an excellent method for quick meals, tacos, or ramen toppings. The fat content makes it ideal for crisping and developing umami flavor in a skillet.
For pork steaks or chunks
I cut boneless pork butt into ½- to 1-inch thick slices or 2-inch cubes, season liberally with salt and dry rub, and let them rest at room temp for 20–30 minutes. I preheat a heavy skillet—usually cast iron—over medium-high heat with a neutral oil.
I sear the meat on all sides until deeply browned. For steaks, that’s about 3–4 minutes per side. For chunks, I sear all sides, then either lower the heat and cover to cook through or finish in the oven.
Heat control and crust formation
I adjust the heat to avoid burning. Pork butt has enough fat to self-baste in the pan, so I usually don’t need to add more than a teaspoon of oil. I also deglaze the pan with vinegar, broth, or citrus juice to make a quick sauce or glaze to pour over the seared meat.
Common Mistakes When Cooking Pork Butt
Even though pork butt is one of the most forgiving cuts, there are a few key mistakes I see over and over again—ones that ruin texture, flavor, or moisture. When you understand these pitfalls, it becomes much easier to cook pork butt perfectly every time.
Undercooking, over-seasoning, skipping rest
One major issue is undercooking. Pork butt needs time—not just to reach temperature, but for collagen to melt and the meat to become tender. Pulling it at 165°F will give you a dry, chewy result. I always wait until it hits 195–203°F for shredding.
Another mistake is overseasoning or adding sugar too early. Rubs that are too heavy in sugar can burn during the long roasting time. I keep sugar low or finish with a glaze later.
Skipping the final rest is also a problem. I always rest the pork for at least 30 minutes after cooking, tented with foil. It allows juices to redistribute and makes carving or pulling much cleaner and more flavorful.
Mismanaging fat or wrapping too early
Cutting off too much fat reduces self-basting. I always leave at least a thin cap on the top. On the flip side, wrapping the meat too early or tightly during roasting can cause the bark to go soggy. I roast uncovered until color develops, then wrap to finish if needed. The timing is key.
Best Sauces and Finishes for Pork Butt
A good pork butt doesn’t need sauce, but the right one can elevate it from satisfying to unforgettable. I use different sauces depending on how I’m serving the meat—sliced, pulled, or cubed—and what cuisine I’m channeling.
Vinegar-based, mustard, and pan jus
For classic pulled pork, I favor a vinegar-based sauce—apple cider vinegar, red pepper flakes, a bit of brown sugar, and a splash of Worcestershire. It cuts through the richness and balances the fat beautifully.
For a Southern twist, I use mustard-based sauces with yellow mustard, vinegar, honey, and cayenne. These work especially well when the pork is served on buns.
When I want to keep it elegant, I reduce the pan juices with garlic, herbs, and a bit of white wine or cider. This makes a light jus that I drizzle over sliced pork for a more refined presentation.
When to sauce before vs after
I never add sauce during slow roasting—it tends to burn or steam the crust. Instead, I glaze during the final broil or toss shredded pork in warm sauce just before serving. This keeps the bark intact and the sauce flavorful without tasting cooked down.
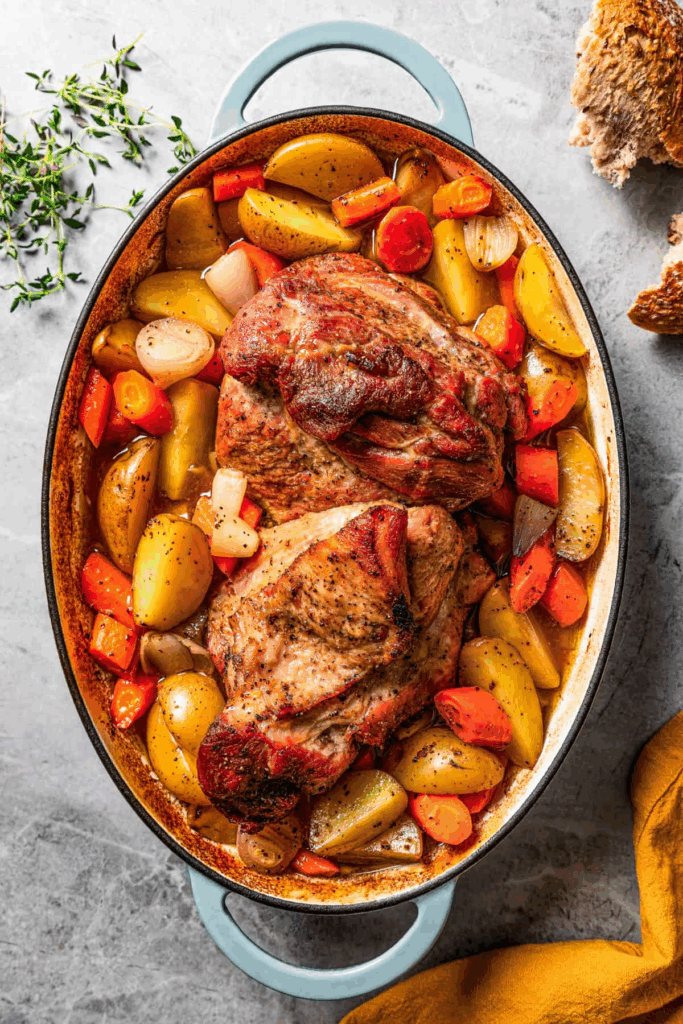
Serving and Pairing Ideas
How you serve pork butt depends on the cut’s final texture and what else is on the plate. It’s endlessly versatile, which is one of the reasons I keep coming back to it in my kitchen.
Classic and creative sides
For pulled pork, I serve it with coleslaw, cornbread, pickled onions, and vinegar greens. The acidity balances the richness. If I’m going for something more elevated, I pair it with creamy polenta, roasted root vegetables, or grilled broccolini.
When it’s sliced or cubed, I serve it with beans, rice pilaf, or herbed couscous. Pork butt also works great in tacos, ramen, stir-fry, or breakfast hash. I plate with contrast in mind: soft meat, crisp vegetable, and something tangy or bright.
How I serve it sliced, pulled, or chunked
For slicing, I chill the roast slightly first—this makes clean, even cuts that show off the grain. For pulling, I use gloved hands or two forks and leave some larger chunks for texture.
For chunking, I cut the pork into bite-sized cubes, then flash-sear them in a pan with a splash of sauce. This adds crispness and caramelization—great for tacos or rice bowls.
Storage and Reheating Without Losing Moisture
Pork butt stores and reheats well—but only if handled properly. Done right, it can taste just as good the next day (or week) as when freshly roasted.
Fridge and freezer best practices
In the fridge, I store shredded or sliced pork in a shallow airtight container, covered with a bit of its own juices or a spoonful of broth. This prevents drying. It keeps well for up to 4 days.
For freezing, I portion the pork into vacuum bags or wrap it in foil, then place it in freezer-safe containers. I remove as much air as possible and label it with the date. Pork butt holds up in the freezer for 2–3 months if packed properly.
Gentle reheating methods for leftovers
I reheat pork butt low and slow—either in a skillet with a splash of broth or in a 300°F oven covered with foil. If I’m using the microwave, I reduce the power to 50% and reheat in short intervals with a moist paper towel over the top.
I always finish with sauce, lemon juice, or even a splash of vinegar to bring the flavor back to life. Properly stored and reheated, pork butt is one of the most delicious leftovers I know.
FAQ
What’s the best oven temperature for cooking pork butt?
I recommend cooking it low and slow—275°F (135°C) is my go-to. It gives the collagen time to break down, resulting in ultra-tender meat. You can go up to 300°F (150°C) if you’re short on time, but I avoid anything higher unless I’m finishing with a broil.
Should I cook pork butt covered or uncovered in the oven?
Both. I start it uncovered to build a crust and render some fat, then cover it loosely with foil after it reaches around 160°F internally. This helps retain moisture without steaming the bark.
What internal temperature is ideal for pulled pork?
For shredding, I always go to 195–203°F (90–95°C). That’s when the connective tissue fully breaks down. If you’re slicing instead, you can pull it at 180–185°F, but it won’t be pull-apart tender.
How long does it take to cook a 6-pound pork butt at 275°F?
Based on my experience, a 6-pounder takes about 6 to 7 hours total—4 hours uncovered, 2 to 3 hours covered. I always go by internal temperature, not just time, because every cut cooks slightly differently.
Can I marinate pork butt overnight?
Yes, and I often do. I recommend citrus-based or vinegar-based marinades with garlic, herbs, and olive oil. Just don’t overdo the acid or it can start to break down the surface too much.
Should I trim the fat cap?
I trim it down to about ¼ inch, just enough to render during cooking. If it’s too thick, it can prevent seasoning penetration. I never remove it entirely, though—it bastes the meat while roasting.
What’s the best way to reheat pork butt?
Low and slow with moisture. I reheat in a skillet with broth, or in the oven at 300°F covered with foil. If using the microwave, I reduce the power to 50% and add liquid to keep it from drying out.
Can I cook pork butt in advance?
Absolutely. I often roast it a day ahead, chill it, then reheat with reserved juices or sauce. It actually shreds better cold and soaks up flavor even more the next day.
Do I need to let pork butt rest after cooking?
Always. I let it rest at least 30 minutes, tented in foil. This allows juices to redistribute, and it makes pulling or slicing easier and cleaner. Skipping this step usually results in dry outer meat.
Can I freeze leftover pork butt?
Yes, and it freezes well if you portion and wrap it correctly. I add a bit of pan juice before freezing to protect moisture and use vacuum bags or airtight containers. It holds for 2–3 months easily.
Is pork butt the same as pork shoulder?
Not exactly. Pork butt (or Boston butt) is the upper part of the shoulder and has more marbling. Picnic shoulder is lower and has more connective tissue and skin. Both work, but pork butt is more ideal for oven roasting.
Can I use pork butt for tacos or stir-fry?
Definitely. Once cooked and shredded, I use it in tacos, lettuce wraps, fried rice, and even pasta. I like to crisp chunks in a skillet before adding to stir-fry for extra texture.
Do I need a roasting rack?
It’s helpful but not essential. A rack allows better airflow and prevents the bottom from stewing in fat. If you don’t have one, thick-cut onion slices or a layer of root vegetables can work as a stand-in.
What’s the best sauce for pork butt?
It depends on the style. For pulled pork, I love vinegar-based or mustard sauces. For sliced pork, I prefer a simple pan jus or reduced broth. I always taste the meat first before adding sauce—sometimes it doesn’t need any.
Can I sear pork butt before roasting?
You can, especially if you’re working with chunks or a smaller cut. For large roasts, I prefer to build the crust during the first uncovered hours in the oven. Searing is useful if you’re using a pressure cooker or braising.


Post Comment