How to Cook Boneless Pork Ribs

How to Cook Boneless Pork Ribs: Ultimate Guide to Tender, Flavor-Packed Perfection
Boneless pork ribs are one of my favorite cuts to work with. They’re versatile, deeply flavorful, and when handled properly, they become juicy, fork-tender perfection. I’ll guide you through everything from seasoning and temperature control to sauce pairings and mistakes to avoid.
- What Are Boneless Pork Ribs and Why They’re Misunderstood
- Choosing the Right Cut and Thickness
- How to Prepare Boneless Pork Ribs Before Cooking
- Essential Ingredients and Kitchen Tools
- Oven-Baked Method: Slow Roast for Fall-Apart Texture
- Skillet-Sear and Oven Finish for Crust and Moisture
- Slow Cooker Method: Set It and Forget It
- Oven-Baked Method: Slow Roast for Fall-Apart Texture
- Skillet-Sear and Oven Finish for Crust and Moisture
- Slow Cooker Method: Set It and Forget It
- Pressure Cooker or Instant Pot Method for Speed and Tenderness
- Temperature and Doneness: When Are They Really Done?
- Time and Temperature Chart for All Methods
- Microwave Method: Quickest Reheat or Emergency Option
- Common Mistakes with Boneless Pork Ribs
- Best Sauces and Flavor Bases for Ribs
- Top Seasonings and Rubs for Boneless Pork Ribs
- Serving and Pairing Boneless Pork Ribs Like a Chef
- How to Store and Reheat Without Drying Out
- FAQ: 15 Real Questions About Cooking Boneless Pork Ribs — Answered by a Chef
What Are Boneless Pork Ribs and Why They’re Misunderstood
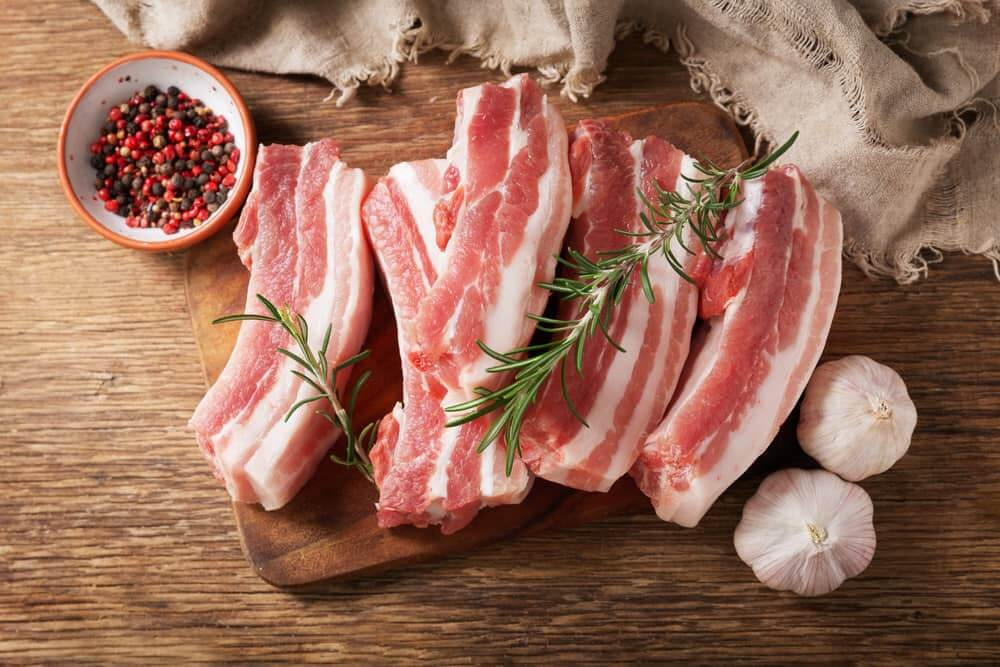
Boneless pork ribs are not actually ribs at all—they’re typically cut from the shoulder or blade end of the loin, and that’s why they can be confusing. In grocery stores, the term “boneless ribs” often refers to country-style pork ribs, which have the shape and size of ribs but no bone. Because they’re cut from a muscular part of the pig, they contain rich marbling and connective tissue, making them ideal for slow cooking.
Where they come from on the pig
Most boneless pork ribs are cut from the upper portion of the shoulder, sometimes referred to as the Boston butt or blade end. They’re meaty, well-marbled, and contain enough fat to stay juicy when cooked low and slow. Unlike baby back ribs or spare ribs, they don’t require long exposure to bone for flavor development—the meat itself has deep character.
Difference from true ribs
Traditional ribs come from the rib cage—either baby back or spare ribs—and have a long bone running through them. Boneless ribs are meatier, denser, and more forgiving for beginners. They don’t grill as well as true ribs, but they shine in braises, oven roasts, and pressure-cooked preparations. I treat them more like stew meat or roast slices, not as barbecue ribs off the bone.
Choosing the Right Cut and Thickness
Not all boneless pork ribs are created equal, and how thick they are affects everything—from sear to tenderness to cook time. I always look for uniform, well-marbled pieces, ideally about 1 to 1.5 inches thick and no more than 6 inches long. This ensures even cooking whether I braise or roast.
Country-style ribs vs blade-end loin
Country-style ribs are the most common and best suited for long, slow cooking. They’re typically fattier and cut from the shoulder. In contrast, blade-end loin ribs come from near the loin and are leaner, which makes them prone to drying out. I use blade-end cuts only when I plan to cook quickly and slice thin. Otherwise, I go with the shoulder-based version every time.
What thickness cooks best
For the oven or slow cooker, I look for cuts around 1.25 inches thick. Thinner cuts overcook quickly and become dry. Thicker pieces need longer braising or pressure cooking but deliver superior tenderness when done right. I avoid anything under ¾ inch unless I’m pan-searing quickly and finishing in the oven with sauce.
How to Prepare Boneless Pork Ribs Before Cooking
Preparation sets the stage for everything else. I start by removing any large surface fat or silver skin with a sharp knife, being careful not to trim off the marbled fat inside. That fat is gold—it bastes the meat from within as it cooks.
Trimming, drying, and seasoning
I pat the ribs dry with paper towels until all moisture is gone—especially if they were in plastic packaging. Wet meat won’t sear. I season generously with kosher salt, black pepper, and a blend of garlic powder, paprika, and mustard powder. For deeper flavor, I let the seasoned ribs rest in the fridge overnight uncovered—this allows salt to penetrate and surface moisture to evaporate, which makes browning more effective later.
To marinate or not?
I marinate if I’m aiming for a specific flavor profile—like Asian (soy-ginger-garlic) or BBQ (smoked paprika, brown sugar, vinegar). For longer cooks like braising or slow roasting, I usually skip the marinade and focus on dry rubs and building flavor in the cooking liquid. Marinating is optional; proper cooking technique is essential.
Essential Ingredients and Kitchen Tools
- Boneless pork ribs (country-style or blade-end cuts)
- Kosher salt
- Fresh ground black pepper
- Garlic powder, smoked paprika, mustard powder
- Brown sugar (optional for BBQ style)
- Onion, garlic, fresh herbs (thyme, rosemary)
- Apple cider vinegar, tomato paste, or Worcestershire
- Chicken or pork broth
- Olive oil or neutral searing oil
- Dutch oven or baking dish with foil
- Cast iron skillet (for searing)
- Digital meat thermometer
- Tongs and sharp knife
- Heavy-duty aluminum foil or parchment
Oven-Baked Method: Slow Roast for Fall-Apart Texture
When I want pork ribs that shred with a fork, the oven is my go-to method. It allows for precise temperature control, caramelization, and a deeply savory result that rivals any slow cooker or grill. I rely on low and slow roasting with steam and fat retention to make this cut sing.
Covered vs uncovered phases
I begin by placing seasoned ribs in a foil-lined baking dish or roasting pan. I add ½ inch of liquid—stock, vinegar, or a mix of both—and tightly cover with foil. I roast at 300°F (150°C) for 2.5 to 3 hours, depending on thickness. This allows the collagen to soften without drying.
For the final 30 minutes, I remove the foil, baste the ribs with their juices or a glaze, and increase the oven to 375°F (190°C). This finishes the texture and gives a slight crust. The meat should jiggle slightly and yield easily to a fork when pressed.
Optimal pan setup and timing
I use a shallow baking dish or Dutch oven, never a deep pot. This exposes the surface to gentle dry heat during the final phase, encouraging browning. If the liquid dries out too quickly, I add a few spoonfuls of hot broth. Timing depends on size, but most boneless pork ribs are ready in 2.5 to 3.5 hours total. I check internal temperature near the end—anything above 190°F (88°C) is fork-tender.
Skillet-Sear and Oven Finish for Crust and Moisture
This is my method when I want quick flavor without sacrificing tenderness. A hot pan gives the crust, and the oven finishes cooking without overexposing the meat to dry heat. I especially like this for thinner ribs or when I want to glaze with sauce during the finish.
Cast iron advantages
I use a cast iron skillet because it distributes heat evenly and retains temperature. I heat the pan over medium-high, add a thin layer of oil, and sear the ribs for 2–3 minutes per side until browned. Then I transfer the skillet to a 325°F (160°C) oven with a splash of stock and cover with foil.
They finish in the oven in 20–25 minutes, depending on thickness. During the last 5 minutes, I remove the foil and brush with sauce—barbecue, glaze, or pan drippings—to caramelize. The result is juicy inside, crispy outside, and faster than a full roast.
Finishing with glaze or sauce
I never add thick sugary sauces during searing—they’ll burn. Instead, I add them near the end and finish either uncovered in the oven or with a quick broil for 3 minutes. The meat should reach 180–190°F, rest for 10 minutes, and cut cleanly with a knife.
Slow Cooker Method: Set It and Forget It
The slow cooker is the easiest method for beginners. It gives consistent tenderness and allows for hands-off cooking, which I use for busy days or batch meal prep.
Best liquid ratios
I place the ribs in the slow cooker and add about 1 cup of liquid for every 2 pounds of meat. I use a mix of broth, vinegar, soy sauce, or tomato base. The ribs should be partially submerged, not fully covered. Too much liquid results in soggy texture. I set to LOW for 6–7 hours or HIGH for 4 hours. When done, the ribs should separate under fork pressure.
When to add vegetables or finish uncovered
If I add vegetables—onions, garlic, potatoes—I do so at the beginning. For tender ribs with a crust, I remove them after cooking and place on a foil-lined tray, brush with sauce, and broil for 5 minutes to caramelize. This adds texture that the slow cooker can’t deliver.
Pressure Cooker or Instant Pot Method for Speed and Tenderness
When I need tenderness in under an hour, nothing beats the pressure cooker. It rapidly breaks down connective tissue without drying, and I can finish the ribs under the broiler or in a pan for color and crust.
Liquid level and natural release
I add 1 cup of broth or sauce to the pot and set the ribs on a trivet to keep them from sitting in liquid. I seal the lid and cook on High Pressure for 35–40 minutes, followed by a natural release for 10–15 minutes. If I quick-release too early, the meat tightens.
Once done, I remove the ribs carefully—they’ll be very tender—and finish them under a broiler for 5 minutes or in a hot skillet with glaze to develop texture and flavor.
Crisping after pressure cooking
To avoid a pale, steamed look, I dry the ribs slightly, brush with sauce, and broil on high. I watch closely—3–5 minutes is enough to caramelize sugars without burning. The internal temperature should still be around 195°F when serving.
Temperature and Doneness: When Are They Really Done?
Boneless pork ribs aren’t just about reaching a safe temperature—they’re about texture. You can technically eat them at 145°F (63°C), but they’ll be chewy and dry. I never serve them below 185°F (85°C) when cooking low and slow.
Safe vs tender internal temps
The USDA recommends 145°F for pork, but that only applies to lean cuts like loin or chops. For ribs, I aim for 190–205°F (88–96°C). At this point, collagen breaks down and the meat becomes soft and juicy. For oven roasting, I target 195°F, and for pressure-cooked or slow-cooked ribs, I go slightly higher for shreddability.
Why probe thermometers matter
I always use a digital probe thermometer inserted into the thickest part of the meat, avoiding fat pockets. This ensures I don’t under- or overcook. I also watch how easily the probe enters and exits—resistance means it’s not ready. I let the ribs rest 10–15 minutes before slicing or serving to redistribute juices and finish internal cooking gently.
Time and Temperature Chart for All Methods
Here’s the temperature and timing chart I follow, based on years of testing in home and professional kitchens:
| Method | Temp Setting | Time Estimate | Internal Temp Goal |
| Oven (covered) | 300°F (150°C) | 2.5–3.5 hours | 190–205°F (88–96°C) |
| Oven (sear + bake) | 325°F (160°C) | 25–35 min after sear | 180–190°F (82–88°C) |
| Slow cooker | LOW / HIGH | 6–7 hrs / 4 hrs | 195–205°F (90–96°C) |
| Pressure cooker | High pressure | 35–40 min + 15 min NR | 195–205°F (90–96°C) |
| Microwave (reheat) | 50% power | 1–3 min in intervals | 160°F (71°C) |
I never rely on time alone. I always test doneness with a thermometer and a fork.
Microwave Method: Quickest Reheat or Emergency Option
I don’t use the microwave to cook boneless ribs from raw—but it can be a useful tool for reheating. It’s fast, but needs to be done properly to avoid dryness or rubbery texture.
Pre-cooked ribs only
When reheating fully cooked ribs—like leftovers from a roast or slow cooker—I slice them into portions, place in a shallow dish with a splash of broth or sauce, and cover loosely. I use 50% power for even heating. High power causes tough edges and uneven temperature.
How to keep them moist
I recommend heating in 30–45 second intervals, flipping or stirring between cycles. Once heated through, I finish with a quick drizzle of glaze, olive oil, or lemon juice to refresh the flavor. For best results, I still prefer using the oven or stovetop, but the microwave can save a rushed dinner.
Common Mistakes with Boneless Pork Ribs
Boneless pork ribs are simple, but small missteps can lead to dryness or toughness. I’ve seen these issues time and again in home kitchens—and fixed them all.
Undercooking, overcooking, over-trimming
The biggest issue is pulling them too early. At 160°F, they’re safe, but not tender. I always wait for the 190°F+ range. Conversely, cooking too long without moisture (especially uncovered) dries them out and ruins the fat’s tenderizing role. I monitor both time and internal temp closely.
Many cooks trim off too much fat, thinking leaner is better. But chuck-based boneless ribs need that marbling—it’s what keeps them juicy. I remove only hard fat caps or silver skin, not intramuscular fat.
Ignoring resting and sauce timing
If you cut immediately after cooking, juices run and the meat feels dry. I always let them rest, tented with foil. And I never apply sugar-based sauces early—they burn before the ribs are cooked. I glaze only in the final 10 minutes, under close watch.
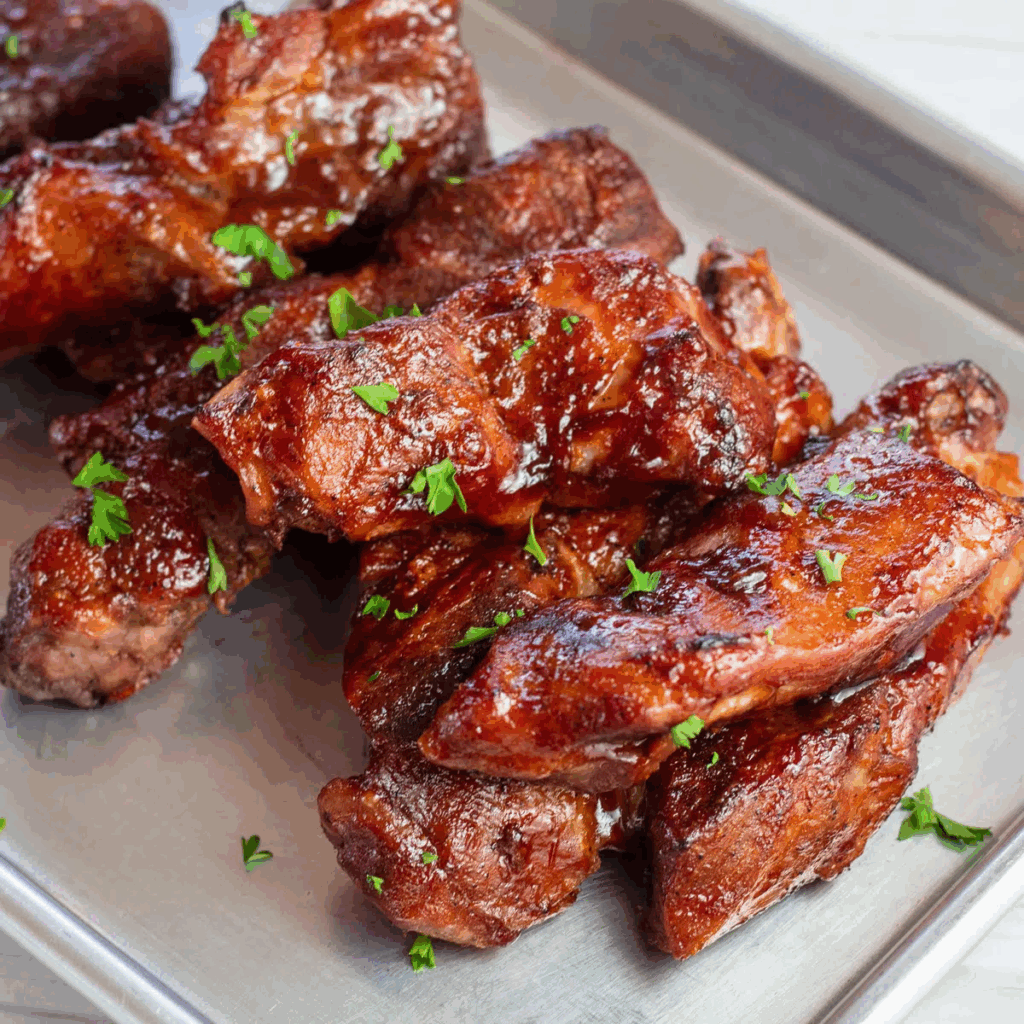
Best Sauces and Flavor Bases for Ribs
Boneless pork ribs are the perfect vehicle for sauces—they absorb flavor and retain moisture beautifully. Whether I’m going classic American, Asian-inspired, or Mediterranean, the sauce can transform the entire profile of the dish.
Classic BBQ, Asian glazes, wine reductions
For barbecue, I go with a mix of tomato paste, molasses, apple cider vinegar, smoked paprika, garlic, and a touch of mustard. I simmer it until it thickens and brush it on only during the last 10 minutes of roasting or searing. The sugars caramelize fast, so applying early often leads to burnt edges.
For Asian-style ribs, I blend soy sauce, ginger, garlic, honey, sesame oil, and rice vinegar, and reduce it to a glaze. I baste it while broiling, letting the sugars tighten into a sticky lacquer.
For something more elegant, I create a red wine and shallot reduction with rosemary and a touch of balsamic. I use this sauce under the meat as plating, letting the natural richness shine.
When to add sauce—before or after cooking?
For slow-cooked or oven-baked ribs, I wait until the final 15–20 minutes to apply sauce. If I’m pressure cooking or using a slow cooker, I cook the ribs in broth or aromatics, then add the sauce afterward and finish under a broiler or in a skillet for caramelization. Sauce should enhance texture and color—not mask mistakes.
Top Seasonings and Rubs for Boneless Pork Ribs
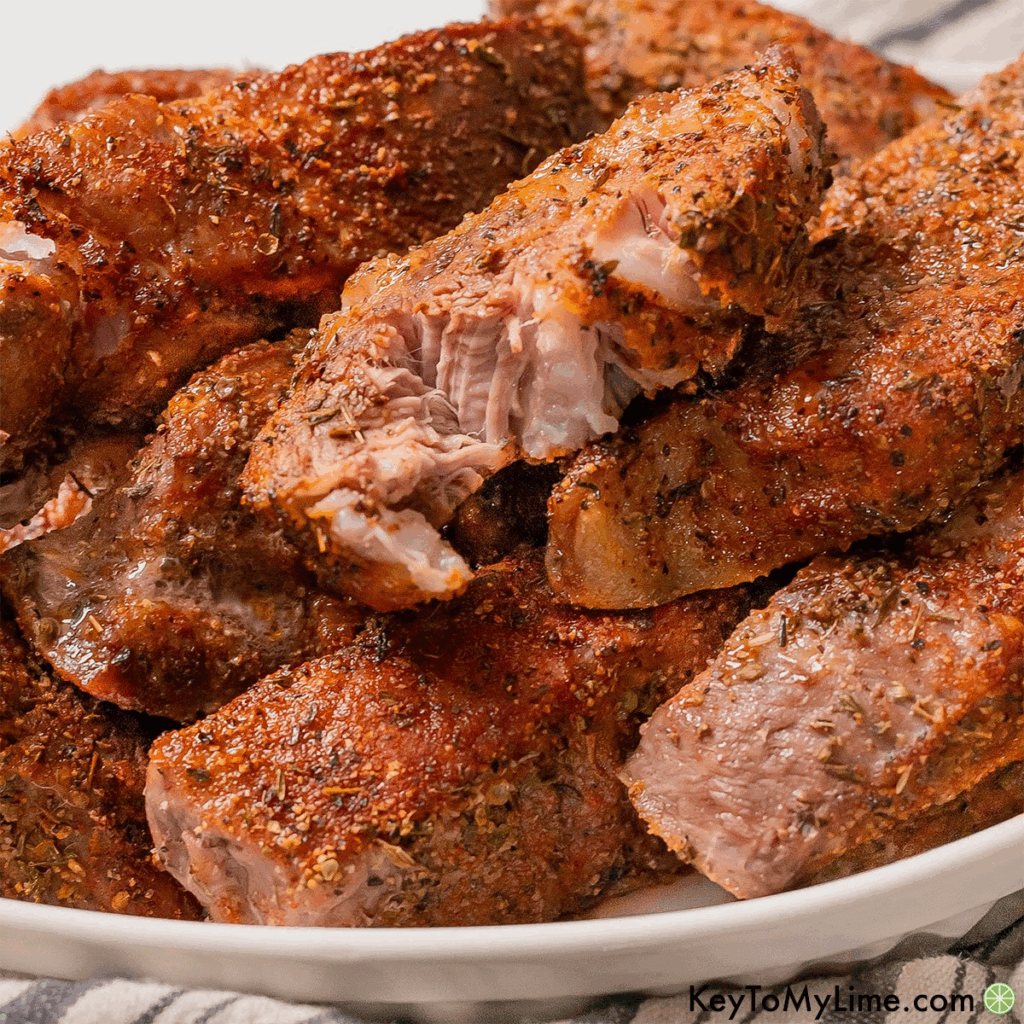
I rely on rubs to build a deep flavor foundation before the first drop of sauce ever touches the pan. A good rub sears into the crust and creates a savory canvas for sauces or glazes.
Sweet vs savory profiles
For BBQ, I balance brown sugar with chili powder, cumin, garlic, onion powder, paprika, and mustard seed. This gives a deep, smoky-sweet flavor that caramelizes well. For savory ribs, I skip sugar and go with thyme, rosemary, fennel seed, black pepper, and dried lemon peel. When aiming for heat, I add cayenne or chipotle and finish with acid for balance.
Dry rub layering and absorption
I season liberally and press the rub into the meat. For deeper penetration, I apply rubs at least 2–12 hours before cooking, uncovered in the fridge. This dries the surface, aids browning, and lets the salt penetrate. I avoid oil before dry rubs—it blocks absorption. I apply oil just before searing, not seasoning.
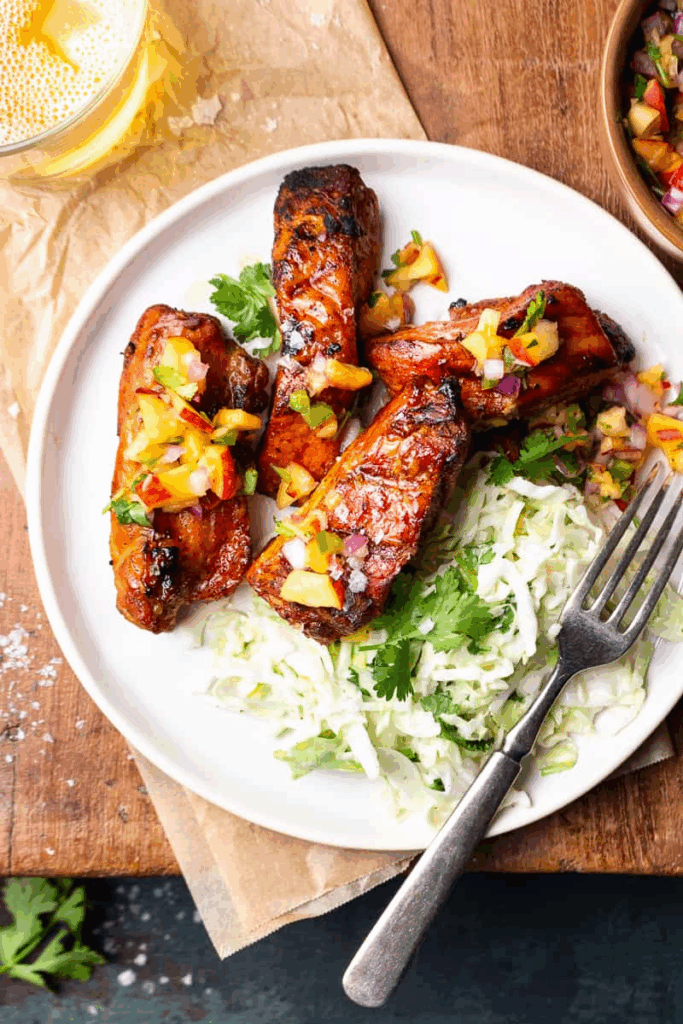
Serving and Pairing Boneless Pork Ribs Like a Chef
Plating ribs well means balancing richness with freshness and texture. Ribs are heavy, so everything else needs to lift the dish visually and on the palate.
Best sides and plate construction
For BBQ ribs, I pair with grilled corn, slaw with vinegar dressing, roasted potatoes, or mac and cheese. For wine-braised ribs, I use creamy polenta, garlic mashed potatoes, sautéed greens, or caramelized onions. With Asian-glazed ribs, I like steamed jasmine rice, bok choy, shredded cabbage salad, or pickled vegetables for crunch.
On the plate, I slice or break ribs into single pieces, spoon sauce beneath them, and finish with microgreens, fresh herbs, or citrus zest. Clean white plates show off the meat’s color and structure.
Slicing or shredding for effect
Boneless ribs can be sliced across the grain if tender but firm, or shredded with forks if cooked until falling apart. For family meals, I serve whole pieces with tongs. For upscale plating, I slice and fan out with sauce trails or a drizzle of glaze for balance.
How to Store and Reheat Without Drying Out
Ribs store incredibly well and often taste better the next day—if you store and reheat them right. The key is locking in moisture and reheating gently.
Fridge, freezer, and reheating strategy
I cool leftovers, then store them in shallow containers with a spoonful of sauce or cooking liquid. In the fridge, they stay perfect for up to 4 days. For freezing, I wrap portions tightly in foil, then place in airtight freezer bags. I add a label and freeze for up to 3 months.
For reheating, I thaw overnight in the fridge, then warm in a covered baking dish with liquid at 275°F (135°C) until hot. On the stove, I use a covered pan with a splash of broth. For shredded ribs, I reheat in sauce on low heat and stir gently. I avoid microwaving full pieces unless moistened and watched closely.
FAQ: 15 Real Questions About Cooking Boneless Pork Ribs — Answered by a Chef
Can I cook boneless pork ribs from frozen?
Yes, but I don’t recommend it unless you’re using a pressure cooker or slow cooker with added liquid. I’ve tried it in a pinch, but thawing overnight in the fridge gives much better flavor and searing ability. Frozen ribs tend to release too much water early and miss out on browning.
What’s the internal temperature I should aim for?
For fall-apart ribs, I recommend 195–205°F (90–96°C). While 145°F is technically safe, it’s not tender. I always use a probe thermometer and pull them when they’re buttery-soft, especially for braising or slow cooking.
Should I sear the ribs before slow cooking?
If you want deeper flavor, absolutely. I’ve done both methods, and searing first creates a crust and adds body to the cooking liquid. Just be sure not to crowd the pan—brown in batches if needed.
How long do boneless pork ribs take in the oven?
In my experience, at 300°F (150°C), they take about 2.5 to 3.5 hours depending on size. Always cover them for the first portion to retain moisture, then uncover for color and finish.
What’s the best way to reheat without drying them out?
I reheat covered in the oven at 275°F (135°C) with a splash of broth or sauce. For shredded meat, I warm it on the stovetop with a bit of glaze. I avoid the microwave unless I use low power and cover the meat properly.
Can I grill boneless pork ribs?
Yes, but only after they’re cooked through. I often braise or pressure cook first, then grill for a few minutes to finish. If you try to grill raw boneless ribs, they often burn outside before cooking inside.
Are boneless ribs healthy?
They’re moderately fatty, especially if cut from the shoulder. That’s what gives them flavor. I trim surface fat but leave the marbling. They’re a good source of protein and iron—just balance with vegetables and lean sides.
Should I use foil when baking?
Yes, always for the initial phase. Foil traps moisture and helps tenderize. I remove it in the last 30 minutes to let the surface color and sauce caramelize.
Can I marinate overnight?
Absolutely. If I want deep flavor, I marinate in the fridge for 8–12 hours in an acidic or spice-heavy mix. Just be sure to pat the ribs dry before cooking to avoid steaming.
Why are my ribs dry?
Usually it’s not enough fat or too much heat. If the ribs are lean and cooked uncovered the whole time, they dry out fast. I always use moisture—broth, sauce, steam—and keep heat around 300°F or lower for long cooks.
What’s the best sauce to serve with them?
I love classic barbecue, soy-ginger glaze, and wine-based reductions. The cut is versatile—bold or bright sauces work. Just make sure it’s balanced: acid, sweetness, and depth.
Do boneless pork ribs need to rest before slicing?
Yes—10 to 15 minutes under foil is ideal. Resting allows juices to settle, especially if the ribs are seared or roasted. If you skip it, they’ll bleed liquid and lose moisture.
What’s the difference between boneless and bone-in ribs in cooking?
Boneless ribs cook faster and are easier to slice or shred. Bone-in versions often have more flavor from the bone, but they take longer and can be trickier to portion. I prefer boneless for versatility and ease.
Can I use the leftover ribs in other dishes?
Absolutely. I shred leftover ribs into tacos, sliders, stir-fries, fried rice, pasta sauces, or even grain bowls. Their rich flavor improves after a day in the fridge.
Do I need to baste during cooking?
Not always. If ribs are covered and cooked with enough liquid, they don’t dry out. I baste only in the last 30 minutes if uncovered, brushing with pan juices or sauce to build a sticky glaze.
Post Comment